CCC Architecture
Programs in Architectural Studies at the City Colleges of Chicago
Description
Fractal – “any of various extremely irregular curves or shapes for which any suitably chosen part is similar in shape to a given larger or smaller part when magnified or reduced to the same size” (Merriam-Webster)

In this exercise you will be using fractals and bicycles in order to study viewports in paper space (layout view). Viewports allow us to control the scale of drawings within a layout. Within a viewport we can control layer visibility so that some layers appear in one viewport but do not appear in others.
Objectives/Outcomes and Assessment Criteria
Students will acquire and demonstrate: 1.) technical competency in working with basic drawing and editingtools as well as viewport tools and settings, 2.) sense of craft through precision and care in the presentation of the work, 3.) design aptitude in the ability to solve an organization problem and explore possible solutions, 4.) judgment in the composition of objects within a field. 5.) consideration of limitations and constraints in the problem solving process.
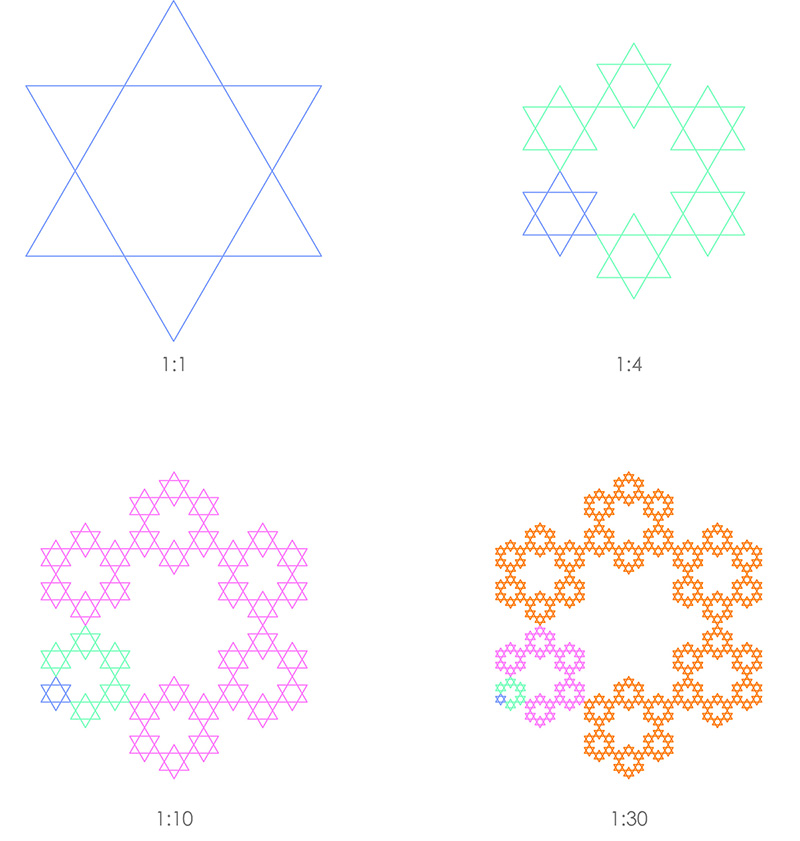
L.Haynes_FractalPattern
Steps
This video will walk you through the steps of the exercise
VP.1. Make a new file by making a copy of your titleblock. Name the file with your last name followed by your first name followed by Viewports. Zaki Mohammad would name his file ZakiMohan_Viewports.
VP.2. Create four new layers. Name them 1, 2, 3 & 4. Assign them different colors between 11-249
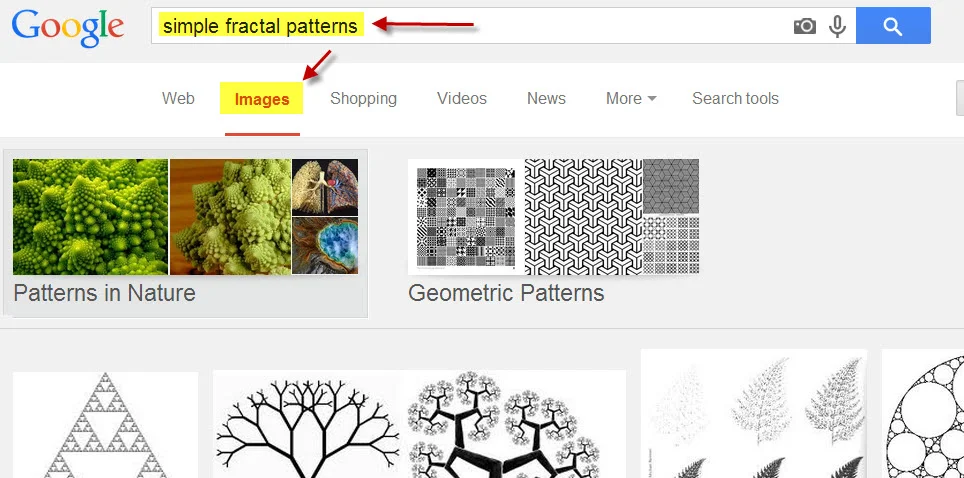
VP.3. Go to Google.
VP.4. Find a fractal pattern to draw. Using the search terms, “simple fractal patterns”, search for patterns using the Google search engine. Click on Images to find fractal diagrams. Search for a pattern that is NOT shown as an example on this page. Before selecting a fractal pattern, it is important to understand how it grows. Look for a pattern that starts as a small unit and multiplies.
You could also generate your own pattern. The patterns often have two components. One is a scale change. The other is a position or rotation change. You can experiment with making up rules for your pattern. For example, start with a line or any shape. Make a copy and place it at the end of the line. Double the scale of the copy. Rotate the copy by a specific number of degrees. Repeat the process.
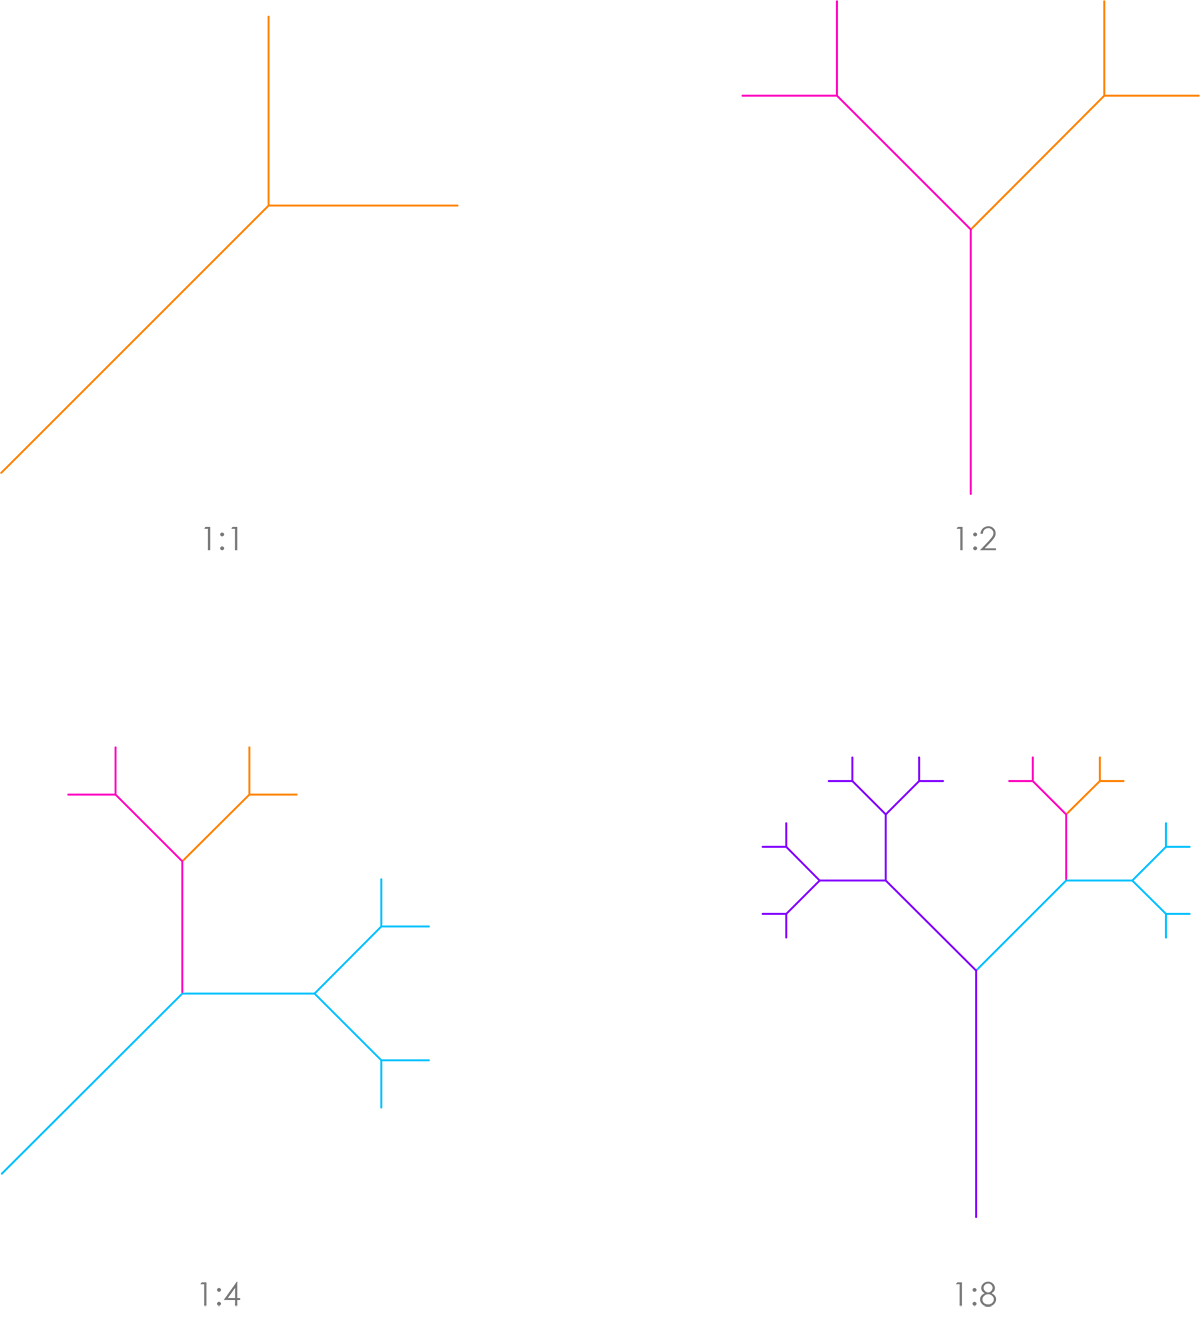
VP.5. Draw the base repeating pattern. On layer 1 (orange in example below) draw the base pattern for the pattern that you have chosen.This pattern should fit within a 3 x 3 square. You can adjust the size of the base pattern using the SCALE command. The example below shows how the image would appear in model space.

The image below is an example of how the drawing would appear in your layout view. In model space you would see the composition in the lower right only. The other viewports zoom into areas on the model. The image shown at a scale of 1:8 below is all that should appear in model space.
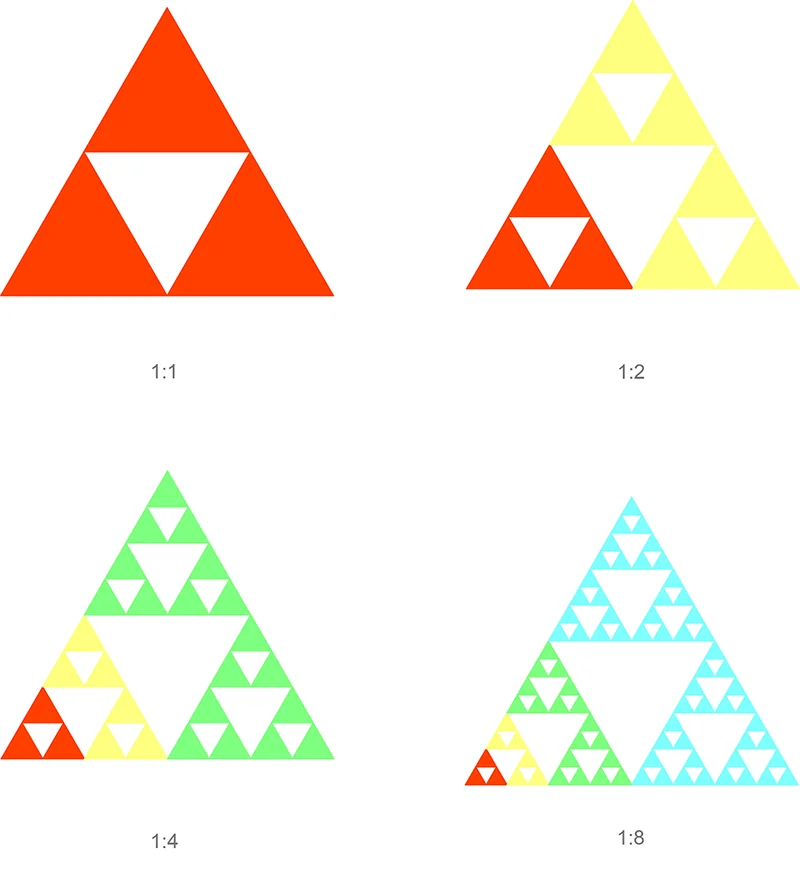
P.Morales_Fractals
VP.6. Add the next iteration of the pattern. Copy the base pattern as necessary to continue the fractal pattern. Put them on layer 2 (magenta in example at VP.5).
VP.7. Add the next iteration of the pattern. Copy the last iteration and repeat as necessary to continue the fractal pattern. Put them on layer 3 (cyan in example at VP.5).
VP.8. Add the next iteration of the pattern. Copy the last iteration and repeat as necessary to continue the fractal pattern. Put them on layer 4 (purple in example at VP.5).
VP.9. Make a copy of the Layout1. Set your layer to g-viewports. In paper space make four 3 x 3 viewports. You can make new viewports using the MVIEW command or use the Viewport Tool. Place these viewports so they fill the 7 x 7 viewport that you already have. There will be 1” between each viewport. Once the 4 viewports are placed, erase the 7 x 7 viewport. in the image below the new viewports are black. The original 7 x 7 viewport is magenta.
VP.10. In the first viewport (upper left) zoom to your base repeating pattern. Set the viewport scale to 1:1. See example toward bottom of exercise.

VP.11. In the second viewport (upper right) zoom to the second iteration. Set the viewport scale to 1:2. If it doesn’t fit try the next preset size.
VP.12. In the third viewport (lower left) zoom to the third iteration. Set the viewport scale to 1:4. If it doesn’t fit try the next preset size.
VP.13. In the fourth viewport (lower right) zoom to the fourth iteration. Set the viewport scale to 1:8. If it doesn’t fit try the next preset size. Change the layers of your viewports to G-viewport so they don't print.
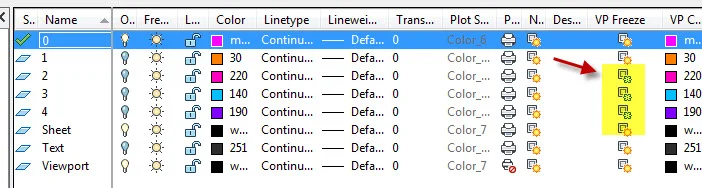
VP.14. Freeze layers within the individual viewports. Look for the VP Freeze column in the Layer Manager. You must be in the viewport to freeze its layers. In the first viewport, freeze layers 2, 3 & 4. In the second viewport, freeze layers 3 & 4. In the third viewport, freeze layer 4. All layers should remain thawed in the fourth viewport.
VP.15. Add the text indicating the scale below each viewport. Use the same text size and scale of text as you have drawn at the bottom of your sheet. Center the text below the viewports. The justification point should be 0.125 below the viewport. Layer: same as your existing text
VP.16. Edit the title text in paper space to Viewport Exercise 1.
VP.17. Rename the layout in the layout tab to Viewport1.
VP.18. In the next part of this exercise you will drawing a bicycle. Go to Google again.
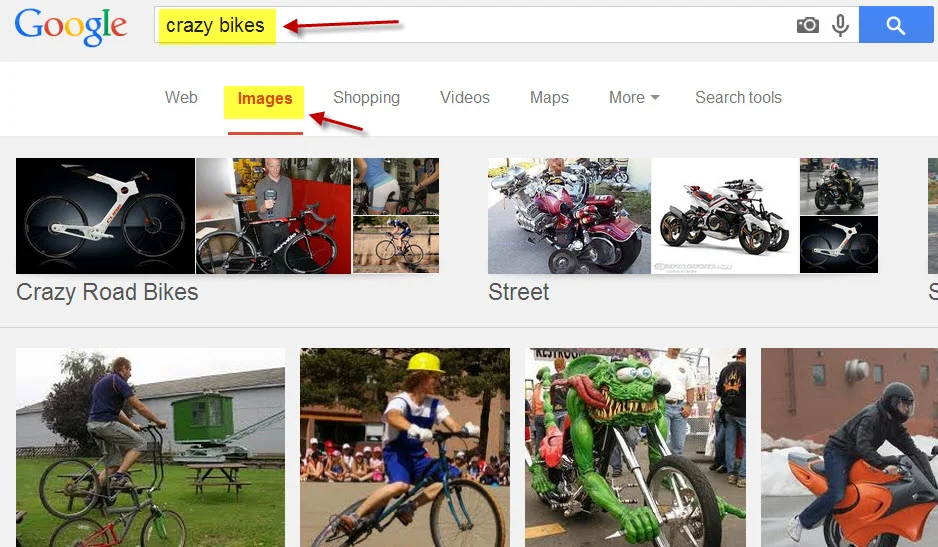
VP.19. Find a bicycle to draw. Using the search terms, “crazy bikes”, search for bicycles using the Google search engine. Click on Images.
H.Skalska
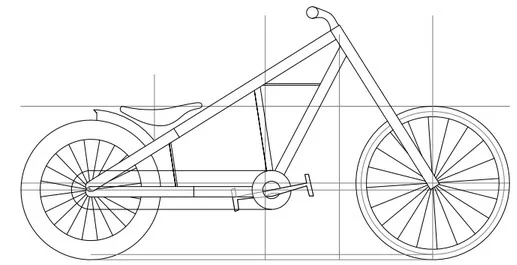
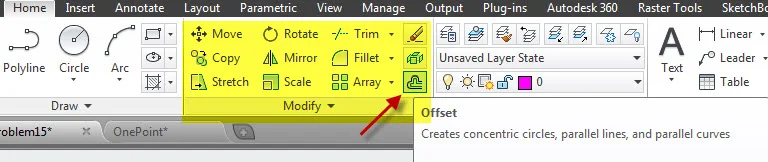
VP.20. Draw a bicycle from the side. It can be drawn on layer 0. If you would like lighter lines for detail, make a new layer and assign color 8 or 9 to it. Do your best to judge the dimensions of the bicycle. A tire is a good place to start. A common size for an adult bicycle tire is 26" in diameter. Keep in mind your own measurements in determining sizes. Many of the tools you will need to generate the drawing can be found on the Modify panel. Offset will be particularly useful in giving width to the various parts of the bicycle. Objects should be drawn as lines, arcs and circles, and not as thickened polylines.
VP.21. Go to the other Layout view that has a titleblock. Zoom to your bicycle in the 7 x 7 viewport.
VP.22. AutoCAD allows you to make any closed shape into a viewport. Draw a closed shape somewhere in the layout. If you construct the shape with more than one element, you will need to join them using the PEDIT command. The shape is your choice. Use a line, arrow or some other graphic to indicate where the enlarged portion is on the bicycle. The idea is to use the closed shape to enlarge some portion of the bicycle, similar to the way shown in the image below. Use the Object Viewport Tool once you have drawn the closed shape.

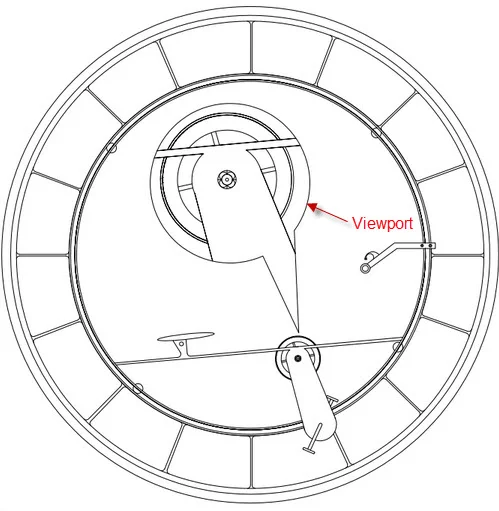
P.Grzegorzewski
VP.23. Enter the viewport and enlarge the view.
VP.24. Edit the title text in paper space to Viewport Exercise 2.
VP.25. Rename the layout in the layout tab to Viewport 2.
VP.26. Retrieve wright.ctb, print to pdf, save your drawing file, close your drawing file, and upload the drawing file and the pdf file to your Google Drive folder.
.
.
.