CCC Architecture
Programs in Architectural Studies at the City Colleges of Chicago
Patterns
AutoCAD is ideal for constructing repeating patterns. By generating one unit, it is possible to generate a pattern using the array functions. For this exercise you will be working with a series of compositions made by taking base units and repeating them into arrays of patterns. You will acquire experience using basic drawing tools, blocks, object snaps, hatches, viewports and layers. There will be three different repeating patterns. Each will be formatted within a 7 x 7 viewport.
Objectives/Outcomes and Assessment Criteria
Students will acquire and demonstrate: 1.) technical competency in working with basic drawing tools and arrays, 2.) sense of craft through precision and care in the presentation of the work, 3.) design aptitude in the ability to solve an organization problem and explore possible solutions, 4.) judgment in the composition of objects within a field. 5.) consideration of limitations and constraints in the problem solving process.
Pattern 1
P.1.1. Make a new file by making a copy of your titleblock. Name the file with your last name followed by your first name followed by Patterns. Nathaniel Chester would name his file NathanielChester_Patterns.
P.1.2. Create new layers as described below:
Layer name, 1; color, any color between 11-249
Layer name, 2; color, any color between 11-249
Layer name, 3; color, any color between 11-249
Layer name, Non-print; color, any color (click on the printer icon so the layer does not print)
The video below will walk you through Pattern 1.
P.1.3. Set your layer to layer 1.

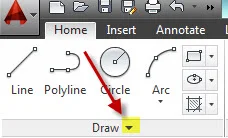
P.1.4. In model space make a donut by typing DONUT at the command line or finding the donut by clicking on the pull down arrow at the bottom of the Draw panel. Set the interior diameter at 0.0 and the outside diameter 0.125. Place the donut at coordinate point 0,0.

P.1.5. A Block is an object within your AutoCAD file. It can have one or more objects within it. Graphic symbols, furniture, and doors are some of the types of objects that are defined as blocks. If an object is a block, all of its components stay together. You can make changes to the block once it has been defined and given a name.
P.1.6. Make sure that the Center object snap is on. Make sure that the current layer is 0.

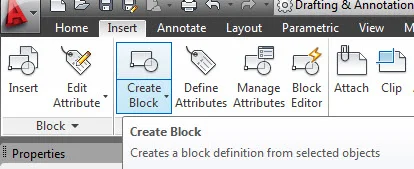
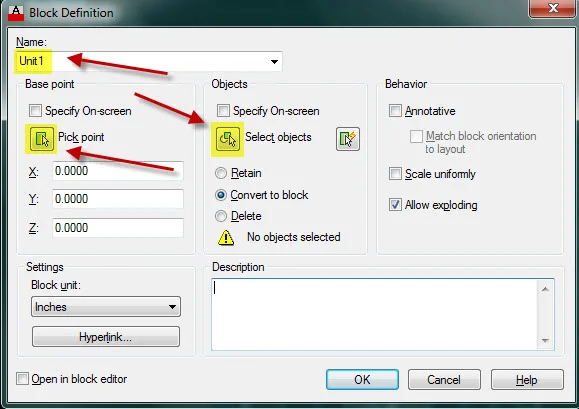
P.1.7. Make the donut into a block using the BLOCK command. Type B at the command line or select the Create Block icon from the Insert ribbon. Click on the Pick point button and choose the center of your donut as the pick point. Click on the Select objects button and select your donut. Name the block Unit1. Select Ok. This block will be the base unit for a repeating pattern.
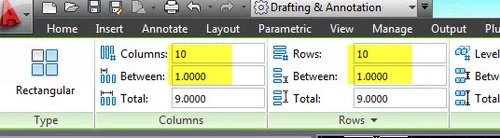
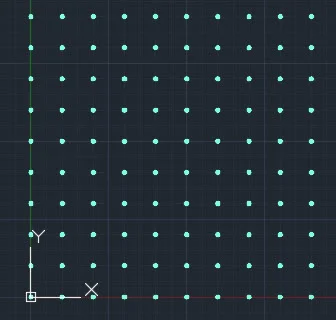
P.1.8. Check to make sure that your current layer is 0. Make a rectangular array of your block. A rectangular array is a set of repeated rows and columns. Type AR at the command line or use the Rectangular Array icon on the Modify panel on the Home ribbon. Select your Unit1 block (the donut). Enter the following information in the blanks that appear on the ribbon. Columns: 10, Between: 1, Rows: 10, Between 1. You should see duplicates of the donut appear.
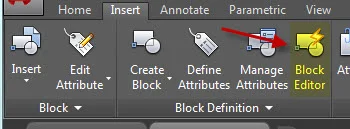
P.1.9. Edit your Unit1 block. The Block Editor allows you to make changes to a block. Those changes will be repeated in all of the blocks. Type BE at the command line to open the Block Editor of select the icon from the Insert ribbon. Click on your new block in the list and then click on OK. Notice how the background has changed to gray. That tells you that you are in the Block Editor.
P.1.10. Set your layer to layer 2. Draw a circle in the block that has its center at the center of the donut and has a radius of 1. See image below.
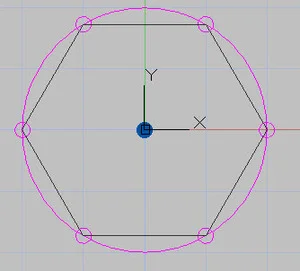
P.1.11. Turn on the Quadrant object snap. On the same layer as the big circle draw a small circle with a 0.0625 radius at the right or left quadrants. Use a polar array to create 6 of the same circles around the circumference of the circle. Make sure the base point of the array is the center of the circle.
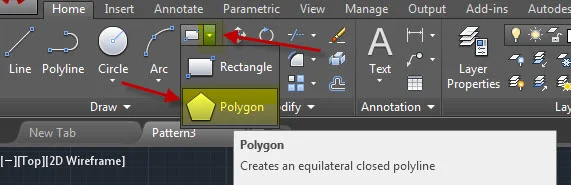
P.1.12. Set your layer to layer 3. Draw a six-sided polygon (a hexagon) inside the circle. Use the POLYGON command or select the polygon tool which can be accessed by clicking on the arrow next to the rectangle tool. Center the polygon at the center of the big circle. Choose the Inscribed option. When you are asked to specify the radius, select the right or left quadrants.
P.1.13. Save the changes to the block. Click on Close block editor on the right end of the ribbon and save the changes. You should see that the changes have been made to all of the blocks within your array.

Pattern 2
For the next part of the exercise you will be continuing your work with patterns. This work will be in the same file as Pattern 1. Like the previous pattern, you will be creating a block that is repeated in an array, but with this pattern, the pattern will be cut out of a piece of thick paper using the vinyl cutter. The general steps are similar to the last one. 1.) You make the smallest repeating unit of your pattern. 2.) You make the repeating unit into a block. 3.) You array the block. 4.) You use the Block Editor to revise the block.
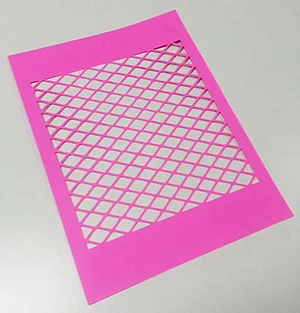
H.Stalska_Pattern printed with the vinyl cutter
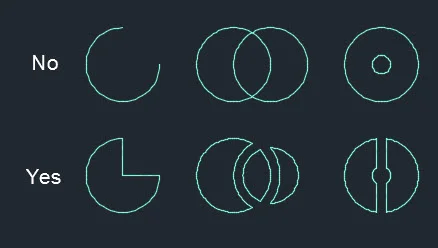
P.2.1. The first step is to find a pattern to draw. Look online for an image, take a photograph of a pattern or invent your own pattern. Your pattern should be different than the pattern shown above. Some things to keep in mind are:
- All forms must be closed shapes.
- No lines in your pattern can cross other lines.
- There can be no shapes inside other shapes.
The image below shows some patterns that won't work for this exercise and some patterns that would work.
The pattern below was used to generate the pink pattern shown above.

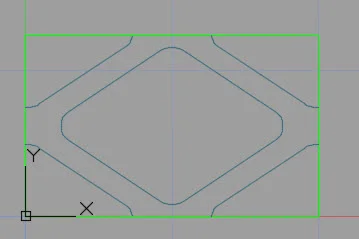
A pattern like the one show below would also work too.
P.2.2. It is easiest to start with a 1 x 1 square, but you can work with other dimensions. Set your current layer to Non-print. Begin by drawing a 1x1 square or rectangle that defines the extent of the repeating pattern as shown in the green rectangle below. If you are working with a different size, that is fine, but use precise numbers like 1.25 x .75, not 0.96325 x .76590.
P.2.3. Draw the pattern that will repeat in that square or rectangle on Layer 1. The square will serve as a reference but will not print.
H.Stalska_Smallest repeating unit
P.2.4. Set your current layer to 0. Make the unit into a block. Name the block Unit 2.
P.2.5. Draw a 7x7 square with its lower left corner at the lower left corner of your repeating pattern. Make an array of your block. If you have made a square repeating unit, enter the following information in the blanks that appear on the ribbon. Columns: 7, Between: 1, Rows: 7, Between 1. If you used a rectangle, make enough rows and columns to fill the square as shown below. Notice how the pattern extends beyond the 7x7 square.
P.2.6. Prepare the pattern so it can be cut with the vinyl cutter. Explode the array. Explode the individual blocks. Trim lines that extend beyond the square.

P.2.7. Set the current layer to the layer of your pattern. Turn off layer 0. Close all open shapes at the edges.

P.2.8. This pattern will be cut out using the vinyl cutter. You will then need to scan the pattern and then upload the image to your Google Drive folder. You may not be able to complete this part before the suggested due date. That is fine.
Pattern 3
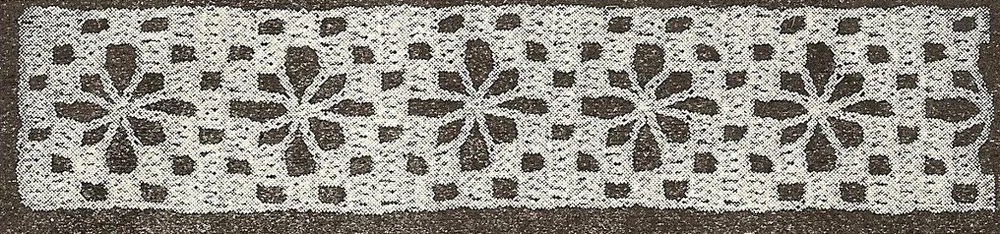
P.3.1. In this final part of the pattern exercise, you will be drawing a pattern based on an actual material like fabric or printed paper or an image of a pattern. Bring your fabric or printed material to class along with a ruler or scale. Scan the fabric or printed material and upload the image to your Google Drive folder. If you are using an image that you found on the web, upload the image to your Google Drive.

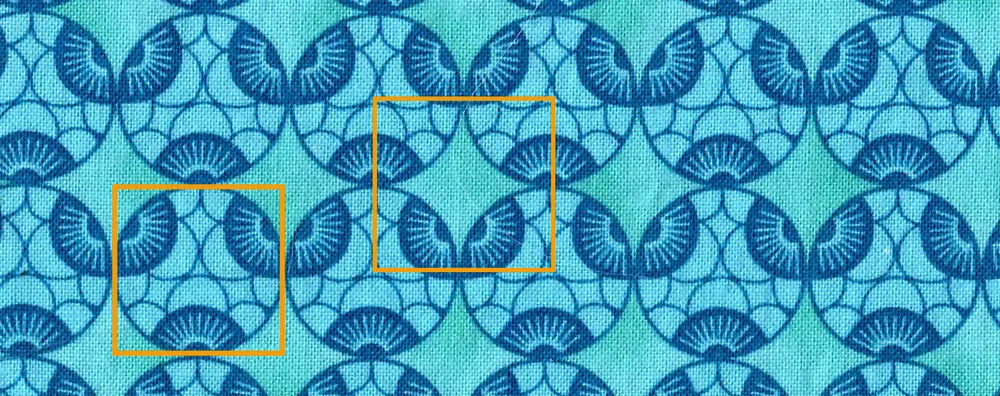
D.Wente_Pattern
P.3.2. Once you have your pattern determine the number of colors you will need. Generate a layer for each color in your pattern. Try to find color that is as close to your pattern as possible. You may use index colors, true colors or the color books.
P.3.3. Determine what is the smallest repeating pattern. In the scanned image of a fabric pattern shown below, the repeating pattern has been identified with orange squares. The base unit could be drawn using either of the identified areas within the material.
P.3.4. On the Non-print layer draw a square or rectangle that represents the extent of the smallest repeating pattern as shown with the orange squares above. If possible, work with common decimal numbers like 1.25 instead of 1.2567.
P.3.5. Then draw the smallest repeating pattern. If your pattern is made of areas of solid color, draw the geometry on the Non-print layer. If lines or arcs appear in your pattern set your layer accordingly and drawn on those layers. Use solid hatch to fill areas of solid color. Change the layers as necessary.
P.3.6. Create a block of your pattern module. Call the block Unit3. The distance between rows and columns will equal the width and height of your module. If necessary, make changes to your block using the Block Editor.
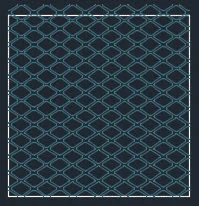
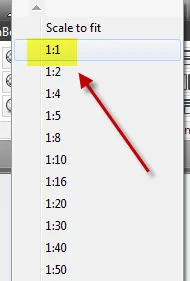
P.3.7. Array your pattern. The pattern must fill the viewport which is 7 x 7 at a scale of 1:1.
Layouts
P.4.1. When you have completed your three patterns go to Layout view.
P.4.2. You must be inside the viewport to change its scale. Double-click inside the viewport. Zoom to the first pattern. Set the scale inside the viewport to 1:1. You will find the Viewport Scale editor along the status bar at the bottom of the screen. Pan until the first pattern fills the entire viewport.
P.4.3. Edit the title text in paper space to Pattern Exercise 1.
P.4.4. Rename the layout in the layout tab to Pattern1.
P.4.5. Make a copy of the layout by right-clicking on it.
P.4.6. Locate the second pattern in the viewport. Adjust the scale to 1:1. Edit the title text in paper space to Pattern Exercise 2. Rename the layout in the layout tab to Pattern 2.
P.4.7. Repeat the steps above for the third pattern.
P.4.8. Retrieve wright.ctb, print each layout to pdf.
P.4.9. Save your drawing file, close your drawing file. Always close files before uploading them. This will prevent you from uploading a file before you have saved it.
P.4.10. Upload the following to your Google Drive folder:
- The AutoCAD drawing file
- Three pdf files to your Google Drive folder
- Scanned image of cut out of Pattern 2
- Scanned image of the pattern you choose for Pattern 3

.
.