CCC Architecture
Programs in Architectural Studies at the City Colleges of Chicago
Pattern Exercise 2
For this exercise you will be reconstructing a pattern using previously researched patterns. The pattern will be constructed in 2D.
Objectives/Outcomes and Assessment Criteria
Students will acquire and demonstrate: 1.) technical competency in working with basic drawing tools and arrays, 2.) sense of craft through precision and care in the presentation of the work, 3.) observational skills in reconstructing a pattern. and 4.) problem solving skills in constructing a three-dimensional pattern.
Steps
P.2.1. The first step is to choose a Spoonflower pattern to draw. Here's a link to the folder where some are located, or you can use one that you loaded to your Google Drive folder. Choose a pattern that has a clear repeat. The repeat can be rows and columns. If you find a pattern that you like, but you aren't sure whether it has a repeat, just ask.
P.2.2. Download the pattern. Rename it Pattern 2.
P.2.3. Make a new file by making a copy of your titleblock. Name the file with your last name followed by your first name followed by Pattern2.
P.2.4. Create new layers as described below:
Layer name, Non-print; color, any color between 11-249, set this layer to not print
P.2.5. Set your current layer to Non-print.
P.2.6. Determine what is the smallest repeating pattern. In the image shown below, the repeating pattern has been identified with an orange square.

Pattern designed by Heather Dutton for Spoonflower.
P.2.7. For rectangular arrays draw a square or rectangle that represents the extent of the smallest repeating pattern as shown with the orange squares above. Work with common decimal numbers like 1.25 instead of 1.2567. If you are working with a polar array, draw a pie shaped area that represents the repeat, and keep in mind that the angle of the pie would be 360 degrees divided by the number of repeats around the circle.
P.2.8. Draw the edges of areas lines within the square or rectangle on the non-printing layer. If you have lines that need to print (like the image above), you will need to create a layer or move those lines to a new layer instead of drawing them on the non-printing layer.
P.2.9. You will be filling in the areas of your pattern with colors. Make a layer for every color in your pattern. Choose a color to represent each layer. It doesn’t have to be the same as the image.
P.2.10. Keep in mind that a shape must be closed to be filled. In the image below, the circle could be filled but the arc on the right could not be filled.

P.2.11. To fill an area, select the appropriate layer, and type Hatch at the command line, or select it from the ribbon.

P.2.12. Choose Solid and Pick Points.
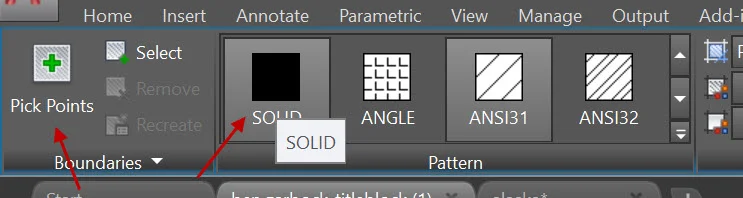
P.2.13. Pick a point inside the area that you want to fill.

P.2.14. Array the pattern in roughly 10 rows and columns. Below you can see three phases of the process. On the left is a drawing made to understand the geometry. In the middle is one module. On the right is the completed array. Use the width and height of your square or rectangle to set the distances between the widths and columns.

P.2.15. In your titleblock fill the viewport with the new pattern. It is ok to allow the pattern to extend beyond the borders of the viewport. Change the title to Pattern 2. Change the layout tab too.
P.2.16. Create a pdf of the layout. Make sure that ccc.ctb is in its proper folder. Name the pdf with your name followed by Pattern2. Unlike other drawings we’ll see color on this pdf.
P.2.17. Save and close your AutoCAD file.
P.2.18. Files to upload
The AutoCAD drawing file
Original pattern used for the project. It should have been named Pattern 2.
The pdf file

.
.