• Gallery
  • About
    • Program Mission
    • Faculty
    • Advisory Board
  • Programs
    • AAS in Architecture
    • Summer Intro Courses
    • Early College Opportunities
  • Courses
    • 110 - Architectural Sketching
    • 121 - Basic Design Studio
    • 122 - Intermediate Design Studio
    • 123 - Advanced Design Studio
    • 166 - Architectural Design 1
    • 170 - Digital Lab 1
    • 171 - Digital Lab 2
    • 172 - Digital Lab 3
    • 202 - Construction 1
    • 204 - Construction 2
    • 220 - Portfolio Development
    • 230 - Structural Fundamentals
    • 266 - Architectural Design 2
  • Class Schedules
    • Spring 2025
    • Summer 2025
    • Fall 2025
  • Digital Access
    • Azure Login
    • Setting up an Archive Using the Google Drive
    • Miro: Login, Access & Tools
    • Autodesk Login
    • Rhino Login & Azure Access
    • Creative Suite Access
  • After CCC
    • Transfer - Architecture
    • Transfer - Interior Architecture
    • Architecture Degrees from Outside U.S.
    • Career Paths
  • Resources
    • CCC + HW Student Support
    • Advising
    • Good Reads
    • Recommended Films & Videos
  • Extra-Curricular
    • Events
    • CCC Urban Sketchers
  • Contact Us

CCC Architecture

Programs in Architectural Studies at the City Colleges of Chicago

  • Gallery
  • About
    • Program Mission
    • Faculty
    • Advisory Board
  • Programs
    • AAS in Architecture
    • Summer Intro Courses
    • Early College Opportunities
  • Courses
    • 110 - Architectural Sketching
    • 121 - Basic Design Studio
    • 122 - Intermediate Design Studio
    • 123 - Advanced Design Studio
    • 166 - Architectural Design 1
    • 170 - Digital Lab 1
    • 171 - Digital Lab 2
    • 172 - Digital Lab 3
    • 202 - Construction 1
    • 204 - Construction 2
    • 220 - Portfolio Development
    • 230 - Structural Fundamentals
    • 266 - Architectural Design 2
  • Class Schedules
    • Spring 2025
    • Summer 2025
    • Fall 2025
  • Digital Access
    • Azure Login
    • Setting up an Archive Using the Google Drive
    • Miro: Login, Access & Tools
    • Autodesk Login
    • Rhino Login & Azure Access
    • Creative Suite Access
  • After CCC
    • Transfer - Architecture
    • Transfer - Interior Architecture
    • Architecture Degrees from Outside U.S.
    • Career Paths
  • Resources
    • CCC + HW Student Support
    • Advising
    • Good Reads
    • Recommended Films & Videos
  • Extra-Curricular
    • Events
    • CCC Urban Sketchers
  • Contact Us

Exercise: Base Volumes

For this exercise you will be modeling some simple volumes that will be used in future exercises. Diagrams of the volumes can be found on page 14 of the book titled, Operative Design: A Catalogue of Spatial Verbs. 

Steps

BV.1. Open Rhino. 

BV.2. Open a new file.

BV.3. Choose the Large Objects - Feet template.

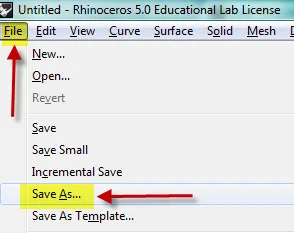
BV.4. Save the file and name it. The name should include be as follows: Your First Name + Your Last Name + BaseVolumes. For example, JaneSmith_BaseVolumes.

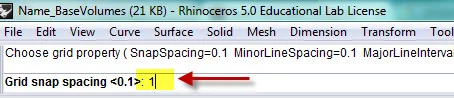
BV.5. We will be working with whole feet so it will be helpful to set the grid snap to increments of 1 foot. Type in Grid at the command line and select the Snap Spacing.

BV.6. Change the value to 1. 

BV.7. Construct 6 volumes as shown on page 14. Use the following dimensions. All of the volumes should be drawn in the same file.

  1. 24'-0" wide x 24'-0" deep x 20'-0" high

  2. Overall 24'-0" wide x 24'-0" deep x 10'-0" high with a 12'-0" wide x 12'-0" deep notch at one corner leaving a volume with an L shape

  3. 12'-0" wide x 24'-0" deep x 20'-0" high

  4. 12'-0" wide x 24'-0" deep x 10'-0" high

  5. 12'-0" wide x 12'-0" deep x 10'-0" high

  6. 6'-0" wide x 24'-0" deep x 5'-0" high

There are a number of ways to construct these forms. One way is to draw the line segments that represent the width and depth and then extrude those lines. Another way is to build them out of solid volumes. Both methods will be shown in the following video. The video shows how to build a box, but keep in mind that the dimensions required for your box are described above. Volume #2 is also shown in the video. 

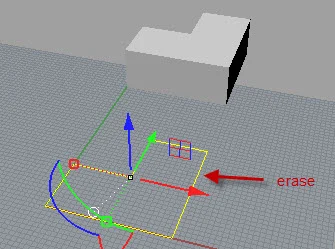
BV.8. As you complete each shape, move them to the side. It is ok if they are outside of the grid. Erase the polylines used to construct the volumes.

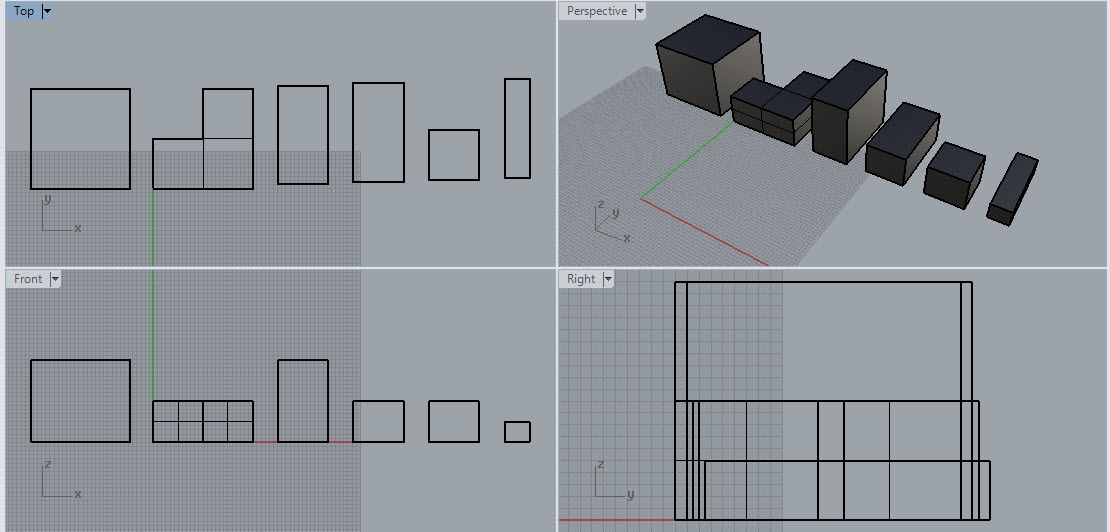
BV.9. The image below shows all 6 volumes. To view all of the volumes in a view window, type Zoom and select Extents. 

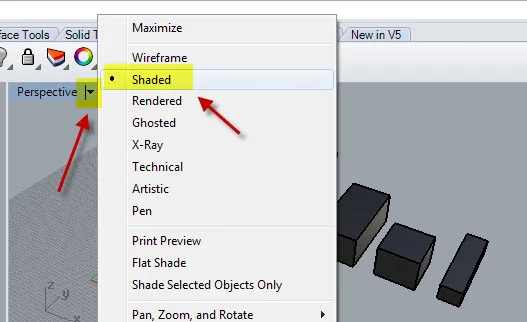
BV.10. Click on the arrow next to the view name to change the visual style.

BV.11. Make sure that the six objects are in a row as shown below.

BV.12. When you have completed your volumes, save and close the file.

BV.13. Upload the Rhino file (3dm) to your Google Drive folder. Put your file in the main folder. I will move the file to another folder once it has been reviewed.


x